Back To The SRT [Small Roon Theory]

As I have sold my home, I am now in the process of redesigning my home theatre yet again for a small room.
My first dedicated small room was based on a theory - If mixing booths for professional multi-channel sound can be small enough to fit into a location van, why could a home theatre not be designed small as well?
And so began the SRT - SMALL ROOM THEORY.
When I first purchased the house, part of the deciding purchase factor was that it needed a small room that I could convert into a dedicated cinema.
The home I bought did have a small room, but after several years in there, I decided that I wanted a larger room, a room that I could share with family and friends.
THE SMALL ROOM THEORY
 The SRT was just 3600mm long, 2200mm wide and just 2100mm high. It was actually a tool shed that I completely stripped and remodeled. During the retrofit, I lined the wall cavities with foam and insulation to help reduce sound transmission - both from out side in as well as inside to the outside...
The room was painted flat back - all 6 surfaces, and was dubbed the CAVE with good reason - it had TOTAL black out capabilities.
The layout was based on the ITU-R from the centre of the room with the LCR speakers located at seated ear height, with C at 0 degrees and L and R at +/-30degrees. The Surrounds (only 2 at the time) were positioned on the side walls at +/-110degrees and about 1500mm off the floor.
I built a stage for the screen (1.78:1 at the time) with recessed speaker cavities to allow a flush finish for the LCRs. The Surrounds were wall mounted using an extruded aluminium rail (which has become a part of the CAVX SPEAKER design). The EQ rack was in the rear left corner and required the addition of an IR repeater.
There was only one row of two seats, so not very friendly for entertaining groups...though one night, I did manage to squeeze 6 people in there...
Seeing as how at the time, I had two 7.1 systems, I decided to set a multi channel music only system in a the lounge room (that wasn't being used for anything else).
I then decided that I liked the larger space, and that I should integrate a video system as well.
THE PLAN FOR THE NEW ROOM
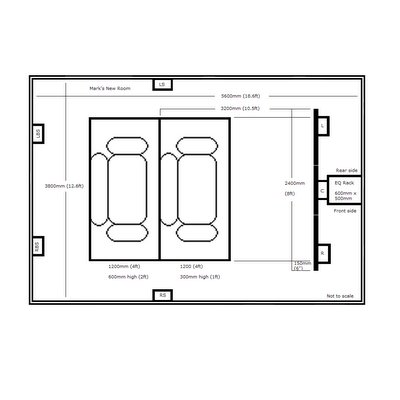
 Above is a the plan I had used in my cinema for over 12 months. The room was 5.6m x 3.8m x 2.4m, and I decided to set up my new cinema. Originally there was to be 2 levels of riser, but in the end, only one was used...
THE FRONT STAGE and 2.37:1 "SCOPE" SCREEN
 The early install of the 235 screen...The EQ Rack is behind the screen so that the lights of the displays are not in the site line. An IR repeater was installed so that I could operate the components from the comfort of my back row seat.
Since this shot was taken, a new masking system including a version of the US "GULL WING" side masking had been added. The new masking systems allows the screen to bow in to correct the optical errors such as pincushion that are bi-products of the anamorphic lens...
THE SEATING

There was two rows of seats and the back row was elevated 300mm. This gaves an excellent site line to both the screen and the LCR speakers. The grey carpet nicely matched the lower wall and the blue seats matched the upper side walls. The ceiling was the same grey as the lower wall...
Mark
Back To The Top

<< Home